KATYUSHA BM13 on ZIS 6
An abandoned Soviet hero - Diorama
Fig 1: Box Art
A colleague of mine recently gave this Alan Hobbies kit to me as he knew I enjoyed building scale models. The kit originally belonged to his father who had recently passed away and so I felt I needed to make something special of this as respect to his father, who was also a scale modeller.
Having taken up the hobby just 3 years ago I wanted to also use this build to experiment with heavy weathering techniques and get to grips with some new products including Mig washes and the hairspray chipping method.
The kit itself is fairly basic, poorly moulded and full of errors. My first port of call was therefore the internet to do a little research and find lots of reference pics (Fig 2). Armed with this information I set about cleaning up the parts. This involved a lot of remodelling as the moulding alignments were very mismatched.
Fig 2: Weathering reference
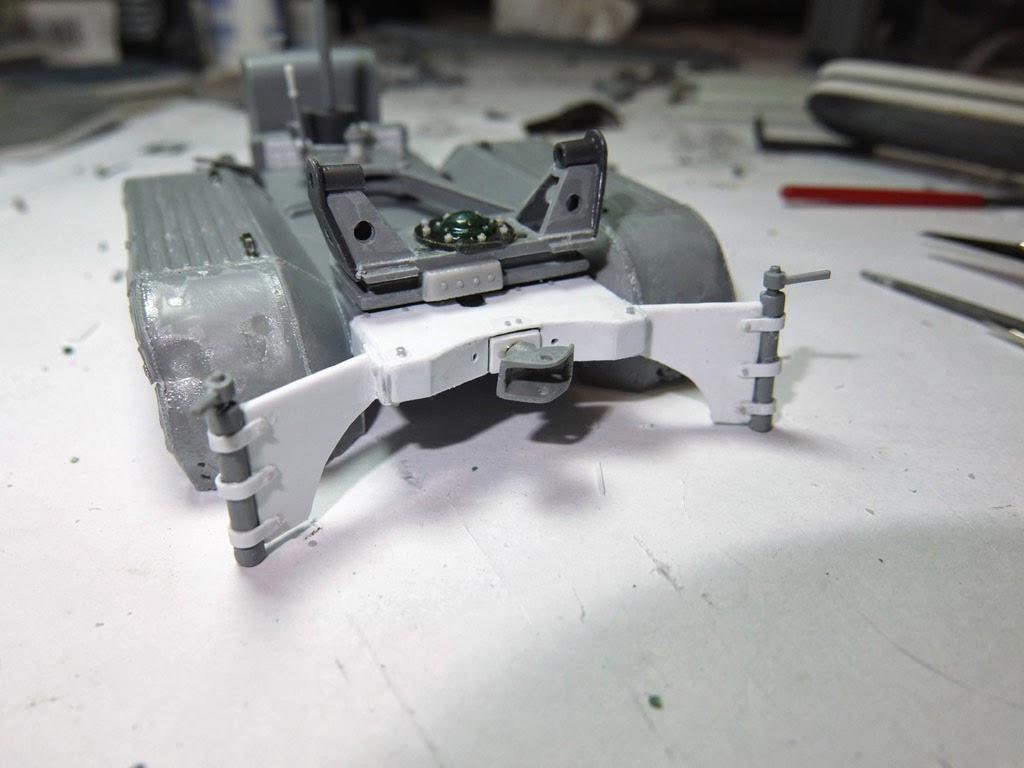
The chassis needed a lot of work and I added small details like weld seams and bolt heads (Fig 3). The engine wasn’t too bad but I added additional wiring, air filter, horn, etc to give it more realism (Fig 4).
Fig 3: Chassis and Engine
Fig 4: Extra Engine detailing
As the build progressed I found myself resorting more and more to scratch building replacements for badly moulded parts and to correct/add parts that were wrong or missing from the kit. This was a new adventure for me and one that was thoroughly addictive and enjoyable (Figs 5, 6 & 7).
I also added rust damage and wear and tear by thinning out the plastic with a Dremel drill and sanding files (Fig 7).
Fig 5: Scratch built rear end. The kit was
totally inaccurate.
Fig 6: The rocket firing control box was missing from the kit and was scratch built.
Fig 7: The aiming mechanism was scratch built and damage added to fenders.
Once the build was complete the fun could really begin. Using colour modulation principles I gave the Katyusha a base coat of rust colours with lighter shades on surfaces which would receive more light and darker shades on areas that would be in shadow (Fig 8).
Fig 8: Colour modulated basecoat of rust colours
Once this had dried I added several layers of acrylic paint in gradually lightened green tones, sprayed through the airbrush and with a layer of hairspray between each layer.
Without waiting for the paint to fully dry I used a variety of flat edge and stubby brushes and tap water and started slowly brushing the paint layers away in places to reveal the rust tones below. This is a critical point in the painting stage and needs to be approached methodically and with care. It is all too easy to remove too much paint and spoil the effect (Fig 9).
Fig 9: The results of using the hairspray chipping method.
Once the chipping was finished I then used a range of acrylic paints to add smaller chips and other rust tones around the build. Filters and washes were then applied using Mig and AK interactive products. I generally used green tones to give the faded and mossy paint look (Fig 10).
Fig 10: Initial washes and filters with Mig and AK Interactive products.
On this build I tried a few new experiments in weathering. One of these was to create realistic looking moss. For this I used crumbled “oasis” flower arranging foam, mixed with PVA glue. After applying on the model I then painted with very runny acrylics and Mig washes to get the look I was after (Fig 11).
Fig 11: Realistic looking moss from “Oasis” and PVA glue.
Another experiment was to recreate scale cobwebs. For this I used Q-tip ear cleaning buds. After dipping the cotton bud end into some buff paint, thinned with water, I carefully teased the strands of cotton off the bud and applied them to the model with PVA glue. It took a lot of trial and error to get right but it was a reasonable success (Fig 12).
Fig 12: Q-tip cobwebs were used in the cab and engine.
With the painting finished I set to work on a simple forest floor base for the Katyusha. I used an IKEA picture frame for the base and built the ground up with DAS clay. Once this had dried I painted some mossy rocks and tree stumps, and a beaten up old steel barrel, and added them to the base (Fig 13).
Fig 13: DAS Clay was used for the ground
work, all set on an IKEA picture frame.
The ground was then covered with a mixture
of chopped and dried herbs, dried leaves and twigs from my garden and some Mig
pigment colours, all mixed up with PVA glue and pasted onto the DAS clay base.
When this had dried and hardened I went over the groundcover with some spot
colours in rust tones using acrylic paint and Mig pigments (Fig 14).
Fig 14: Mixed dried herb groundcover and
leaf fall added to the Katyusha.
Finally I purchased around 6 sets of laser
cut paper ferns from Js Works in Germany. When they arrived I sprayed them in
various brown and buff hues to look like autumn ferns. I then glued 2 or three
fern fronds together and stuck them into pre-drilled holes in the base (Fig 15).
Fig 15: Laser cut paper ferns from Js works added to base.
I can’t think of another build that I have enjoyed as much as this one. It was both challenging and fun and I learned a great deal from the experience.